
Resolving print cartridge error messages
After you install a print cartridge, one or both of the print cartridge status lights begin to
blink. The printer will not print. One of the following messages may appear on your
computer screen:
Print Cartridge Problem
Incorrect Print Cartridge(s)
Incorrectly Installed Cartridge(s)
Print Cartridge(s) Missing
Chapter 11
78
Troubleshooting
T
roub
les
hoot
ing
NOTE:
In the procedures below, the "problem" cartridge is identified by the blinking
light. The light on the left blinks when the tri-color print cartridge (on the left) is the
problem and the light on the right blinks when the black cartridge (on the right) is the
problem. If both lights blink, either both cartridges are the problem, or the printer
cannot determine the problem cartridge.
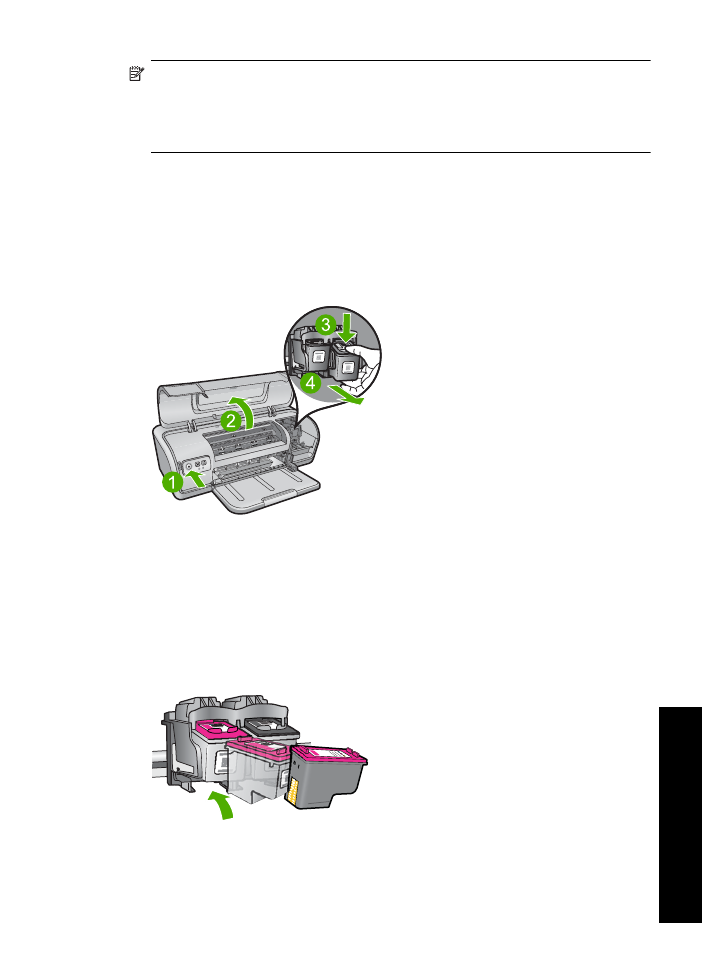
To determine which cartridge is having the problem
1.
Make sure the printer is on.
2.
Open the printer cover. Wait until the print cartridge carriage moves to the right side
of the printer and is idle and quiet.
3.
Remove the tri-color print cartridge from the slot on the left. Press down on the
cartridge, and then slide it out of the print cartridge carriage.
4.
Close the printer cover.
5.
Check to see if the error has been resolved.
•
If the error has been resolved, then there is a problem with the tri-color print
cartridge.
•
If the error has not been resolved, continue to the next step.
6.
Open the cover and reinsert the tri-color print cartridge by sliding it forward into the
slot on the left. Then push the print cartridge forward until it snaps into place.
7.
Repeat the steps to remove the other print cartridge from the slot on the right.
Print cartridge problems
79
Trou
bles
ho
ot
ing
8.
Check to see if the error has been resolved.
•
If the error has been resolved, then there is a problem with the black print
cartridge.
•
If the error has not been resolved, then there is a problem with both print
cartridges.
9.
When you have identified the problem cartridge, continue with the following solutions.
Work through the following sections in order. When the print cartridge status light stops
blinking, you have solved the problem.
•
Solution 1: Remove and reinstall the print cartridges
•
Solution 2: Clean the print cartridge contacts
•
Solution 3: Print in ink-backup mode
Solution 1: Remove and reinstall the print cartridges
Solution:
The print cartridge may not have full electrical contact with the printer.
Removing and reinstalling the cartridge may help.
NOTE:
HP cannot guarantee the quality of remanufactured or refilled cartridges.
To verify and install the correct print cartridges
1.
Make sure the printer is on. Press the
Power
button if it is not lit.
2.
Open the printer cover, and then wait until the print cartridge carriage is idle and
silent.
3.
Press down lightly on the end of the problem cartridge to release it.
4.
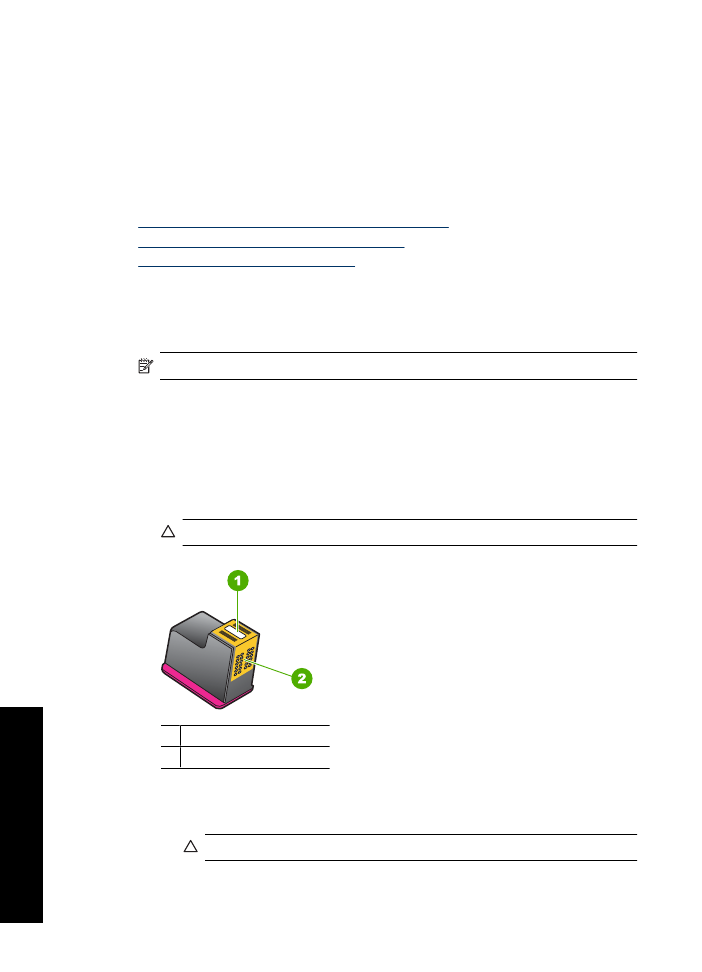
Slide the cartridge out and inspect it:
CAUTION:
Do not touch the copper electrical contacts or the ink nozzles.
1 Ink nozzles (do not touch)
2 Copper contacts
•
Check the electrical contacts for debris.
•
Make sure all the clear nozzle protective tape has been removed.
CAUTION:
Do not attempt to remove the copper electrical strip!
Chapter 11
80
Troubleshooting
T
roub
les
hoot
ing

5.
Read the selection number on the print cartridge label and make sure it is
compatible with your printer. Compatible print cartridges are listed in the reference
guide that came with your printer.
1 Selection number
6.
If the print cartridge has the wrong selection number, install a new print cartridge.
For more information, see
Installation instructions
.
7.
Close the printer cover.
If this did not solve the issue, try the next solution.
Solution 2: Clean the print cartridge contacts
Solution:
If the print cartridge selection number is correct and the previous solution
did not resolve the problem, try cleaning the print cartridge. For more information, see
Manually clean print cartridges
.
If the print cartridge status light continues to flash after cleaning the print cartridge,
replace the print cartridge. For more information, see
Replace print cartridges
.
If this did not solve the issue, try the next solution.
Solution 3: Print in ink-backup mode
Solution:
If you do not have a replacement print cartridge, you can still print in ink
backup mode. Remove the problem cartridge and print with the remaining cartridge.
For more information, see
Ink-backup mode
.